Friday, May 27, 2011

PBOCC Cookies

PBOCC, peanut butter oatmeal chocolate chip that is. Mmmm, just seeing those five initials makes me salivate. It all started at the best little cookie shop, The Colorado Cookie Company, in Southlands Mall. (If you live in Colorado, you must stop there the next time you are at Southlands.) They have between 10 and 20 delectable cookie varieties available at any given time. Every time we go to Southlands we stop in for a cookie, and for me it is a PBOCC every time. I have been on the hunt to replicate this cookie since the first time I bit into one. Here it is and it is worth every single calorie!
(As a side note, this recipe doesn't have any flour. I think that makes it gluten free!)

This recipe comes from allrecipes.com and is listed as Monster Cookies. I cut the original recipe in half and had more than enough cookies (about 2 dozen giant cookies!). Here is the halved recipe for ya.
PBOCC Cookies
3 eggs
1 cup plus 5 Tbs. packed brown sugar
1 cup white sugar
1 tsp. vanilla extract
2 tsp. baking soda
1/2 cup butter
1 1/3 cups peanut butter (I used crunchy, but creamy works too!)
4 1/2 cups rolled oats
1 cup semi sweet chocolate chips (I added a cup of white chocolate chips as well because I'm crazy like that)

-Preheat oven to 350 degrees F (175 degrees C). Lightly grease cookie sheets. 
-Cream butter and peanut butter together. Add the sugars and stir until well mixed. 
-Add eggs one at a time, then add vanilla. 
-Mix oatmeal and baking soda separately, then stir into batter. 
-Add chocolate chips last. 
-Drop by heaping teaspoons onto cookie sheets. Bake for 12-15 minutes. 
(I made them slightly bigger than golf balls and put 5 on a sheet. Then I pressed them down slightly before baking them and they were big and beautiful!) 


Just 5 on a sheet makes big and beautiful cookies!
My husband and brother-in-law are particular about their cookies, and they would not stop raving about these ones. Seriously. They are the best cookies ever. I'm not joking. Do yourself a favor and go make some.

Thursday, May 26, 2011

Classic Potato Salad

This recipe comes from my mother-in-law. She and her mom make it every year. It is a classic and it is oh so good. I don't know if my version quite matches up, but it gets eaten so it must not be too bad.
Potato salad isn't known for being colorful, but it is oh so tasty!

Classic Potato Salad
6-8 potatoes, boiled, peeled, and cut into bite-sized chunks
6 eggs, boiled, cooled, peeled, and chopped
1/4-1/2 cup chopped dill pickles (not sweet!)
1/3-1/2 cup chopped onion (about 1/2 large onion)

Dressing:
2-3 cups mayo
1-2 Tbs. yellow mustard
1/4 pickle juice
salt and pepper

Toss together the salad ingredients. Then mix the dressing ingredients. At this point taste the dressing. If you like it tangier, add more pickle juice. If you like it creamier, add more mayo. If you like more of a kick, add more mustard. Carefully fold the dressing into the salad. Chill until ready to serve. It is best after it has chilled for 3-4 hours.

Tuesday, May 24, 2011

Orange and Almond Salad

I made this one to go with our Easter dinner this year. I think it was perfect for the occasion, but the fresh flavors would also work well at a summer cookout.
This recipe comes from TwoPeasandaPot.blogspot.com


Orange and Almond Salad

1 large head of red leaf lettuce-washed, dried and chilled (I used Romaine)
1 sm. red onion-thinly sliced in rings (about 1/3 cup)
2 oranges peeled and cut into sections
1 small jicama cut in julianne strips
1/3 cup sugared almonds (see directions below)

Place 1/2 cup sliced almonds in non-stick skillet. Sprinkle with 3 T white sugar. Over medium head stir until sugar dissolves and almonds are coated. Cool.

Dressing: Mix together and chill
1/2 cup orange juice
2 T. red wine vinegar
1/4 cup olive oil
2 T. sugar
1 T. Good Seasons dry Italian salad dressing mix

Toss salad right before serving. Sprinkle almonds on top.

Monday, May 23, 2011

Barbeque Chicken

With Memorial Day coming right up I thought I would post some great recipes for a cookout. Whether you are busting out the grill or attending a potluck. This week's recipes are all a great way to kick off the summer!
We'll start with an easy entree on the grill, followed by two yummy salads worthy of any potluck, and end with the best cookie recipe ever (I'm serious. I had some serious cookie critics name these the best ever!)

This recipe is so simple, that I feel a little silly posting it. But it is such a staple at our house in the summer time that how could I not post it? It's one of those entrees that is so simple so you can focus your attention on the sides and dessert. And that's how I like it.
Photo courtesy of somanyrecipes.com via google images


BBQ Chicken
Several pieces of chicken--I have used bone-in legs and thighs, but my favorites are the tenderloins
1 bottle good BBQ sauce any flavor--we like Sweet Baby Rays around here

-Brush the chicken with BBQ sauce, cover, and refrigerate for at least an hour
-Preheat the grill to medium heat
-Brush the grill with oil to prevent sticking
-Place the chicken on the grill and cook on medium
-Flip partway through (the cooking time depends on what pieces of chicken you have and the thickness of the meat. Tenderloins cook very quickly, legs and thighs take a lot longer.)
-Once the chicken is cooked through (I would use a meat thermometer for legs and thighs) brush the chicken with more BBQ sauce and turn the heat up to high.
-Cook for 1-2 minutes on each side, just until the sauce starts to caramelize and form a bit of a crust
-Serve with more BBQ sauce and lots of yummy sides!

Friday, May 13, 2011

Best Cinnamon Rolls Ever!

I LOVE cinnamon rolls! However, I have not had very good luck making them. They either turn out too dry, or don't rise enough, or the filling melts out, or something makes them not very good. I usually resort to making Pillsbury Cinnamon Rolls from a can. That is, until now! I googled Cinnabon copycat recipe and this is what I found. And they were fantastic! Cinnamon rolls are a little labor intensive, but I think they are so worth it!
This recipe comes from www.cdkitchen.com.

Best Cinnamon Rolls Ever
1/2 cup warm water
2 packages active dry yeast
2 tablespoons sugar
1 package Instant Vanilla Pudding Mix (3.5 Oz)--plus the milk required on the package
1/2 cup butter, melted
2 eggs, beaten
1 teaspoon salt
8 cups flour

5 each 8 Or 9 Inch Square Baking Pans!! (I just used 3 regular 9x13 pans)
Topping
1/2 cup butter, melted
2 cups brown sugar, packed
2 tablespoons cinnamon
Frosting
8 ounces cream cheese, softened
1/2 cup butter , softened
1 teaspoon vanilla extract
3 cups powdered sugar
1 tablespoon milk


In small bowl, combine water, yeast and sugar. Stir until dissolved. Set aside. Yeast should bubble. In large bowl, make pudding mix according to package directions. Mix until slightly thickened. Add butter, eggs, salt; mix well. Add yeast. Blend. Graudually add flour and knead until smooth.

Place in large greased bowl. Cover and let rise in warm draft free place until double in size, about 1 hour. Punch down and let rise again, about 45 minutes. On lightly floured surface, roll out to 34" x 21" rectangle. Spread 1/2 c melted butter over surface.

In small bowl, mix topping (brown sugar and cinnamon). Sprinkle over top of dough. Starting at the long edge of the dough, roll up very tightly. With a knife, put a notch every 2 inches. With string or thread place under roll by notch and cross cross over to cut roll.

Place 4 rolls (6 if using a 9x13) into each baking pan, 2" apart. Cover and let rise in warm draft free place until double. Bake @ 350 for 15-20 minutes, remove when golden brown.

Combine all frosting ingredients and mix until smooth. Spread on warm rolls. Serve warm.


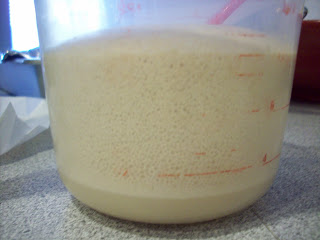
Let your yeast get good and frothy. Be patient.
Mix up the pudding. This is the secret ingredient to make a fantastic dough.
Add the rest of the dough ingredients and mix and knead until you have a ball of soft dough.
This is what it should look like after an hour or two.
Punch it down. One big punch in the middle is generally all it takes.
Roll it out and add the topping. I worked with half the dough at a time and it was much easier to handle.
Roll it up tightly, cut using dental floss, and place in a greased pan. Don't place them too close together.
Once they have risen again, they are ready for baking!
Fresh out of the oven. Don't over bake them or they will dry out.
Frost and eat while they are still warm. If you are not going to eat them all right away, I would recommend to not frost them and store them covered. Pull them out one at a time, microwave for 30 seconds, then frost. Almost as good as straight from the oven.

Wednesday, May 11, 2011

Crispy Garlic Chicken

This is an easy and delightfully delicious chicken dish. I love the crispiness combined with the garlicky flavor. I served this with artichokes and rice pilaf and it was the perfect weeknight meal.
This recipe comes from www.melskitchencafe.com.

Crispy Garlic Chicken
8 tablespoons (1 stick) butter
3 garlic cloves, finely minced
2 thick slices whole wheat bread--for about 2 cups fresh bread crumbs (I used Panko bread crumbs instead)
1/2 cup finely grated Parmesan cheese
1 1/2 teaspoons kosher salt
1/2 teaspoon ground black pepper
4 large boneless, skinless chicken breasts

Preheat oven to 350 degrees F. Line a rimmed baking sheet with aluminum foil and coat lightly with nonstick cooking spray. Set aside. Combine butter and garlic in an 8- or 10-inch skillet. Heat over medium heat until the butter has melted. Pour the butter/garlic mixture into a shallow pie plate or similar dish and cool to room temperature.
In the bowl of a food processor, tear the bread into large chunks, and pulse until the bread is ground into crumbs. Pour the bread crumbs into a shallow pie plate or shallow bowl and toss with the Parmesan cheese, salt and pepper.
Dip each chicken breast in the melted, cooled garlic butter. Transfer to the bread crumb mixture and turn until coated on all sides. Arrange the chicken in one flat layer on the prepared baking sheet. Drizzle any of the remaining melted butter over the chicken. Bake the chicken until it is lightly browned and just cooked through, 40-50 minutes. The baking time will depend on the thickness and size of the chicken you are using. Don’t overcook or the chicken will be dry. (I used a meat thermometer poked in the side to make sure it was done without cutting it open.
Melt the garlic and butter together.
Mix the bread crumbs, parmesan cheese, salt and pepper to coat the chicken.
Place the breaded chicken on a greased cookie sheet covered in foil.
Bake until your meat  thermometer reads 165.
The perfect weeknight meal!

Monday, May 9, 2011

Steamed Artichokes

I LOVE artichokes. If I can find them in the grocery store for a dollar or less, I get them every time. My favorite way to eat them is steamed with a little lemon juice and mayo or melted butter. Yummm!

Steamed Artichokes
artichokes (best in late spring and early summer)
lemon juice (fresh is best, but I often use bottled)
something to dip them in (I like mayo, my husband likes melted butter)

-It can be a little tricky to pick the right artichoke. Look for one that feels heavy for its size and has tightly packed leaves.
-Using a sharp knife cut off the stem end of the artichoke and using the point of the knife make an X in the bottom.
-Then use the knife to cut off the top of the artichoke to make it flat. I sometimes cut off as much as 2 inches of the top. The part you eat is mainly at the bottom, so don't worry about cutting off too much.
-Rinse the artichokes under the faucet. Be sure to rinse the top really good so water gets between the leaves. This will not only help get rid of any dirt, but will help with the steaming as well.
-Place the artichokes, top down, in a glass casserole dish and lightly cover. I like to use my round Pyrex dish that came with a glass lid. I can fit 3-4 artichokes in it. The lid usually won't close tightly, but that's ok. You actually want some of the steam to be able to vent out.
-Microwave on high for 3-5 minutes per artichoke. The water from rinsing will steam them and the X in the stem helps some of the steam escape.
-You know they are done when you can easily pierce the stem with a fork.
-Carefully turn them right side up and squeeze lemon juice on top.
-To eat, pull off one leaf at a time and dip the base of the leaf in mayo or melted butter and scrape off the meat with your teeth.
*Note the outer-most leaves may be too tough to eat. Just pull them off and discard.
-Once you get to the middle where the leaves are flimsy and have little meat, you can either discard the rest (but that would be a shame) or cut off the top and the choke (the hairy stuff) to expose the artichoke heart. Mmm!
My artichokes all prepped and ready to be cooked.
One of the tasty leaves after the meat is scraped off. It may seem like a lot of work for a little bit of meat, but all those leaves add up fast. And it is so worth it!

Friday, May 6, 2011

The Best Lemon Bars

I love lemon bars, but I have found that not all lemon bars are created equal. I tried this recipe the last time I made them and I am so glad I did. In my opinion the perfect lemon bar keeps its shape, has a strong lemon flavor, but is not too tart. Not only does this recipe makes the best lemon bars but, it's not too difficult, and it makes a large pan so there's plenty to share.  Lemon bars are the perfect spring time treat!
This recipe comes from the big red Better Homes and Gardens Cook Book.

Lemon Bars
2 cups flour
1/2 cup powdered sugar
2 Tbs. corn starch
1/4 tsp. salt
3/4 cup butter
4 eggs, lightly beaten
1 1/2 cups sugar
3 Tbs. flour
1 tsp. finely grated lemon peel
3/4 cup lemon juice (fresh is best, about 3 lemons)
1/4 cup half and half, light cream, or whole milk
extra powdered sugar

Preheat oven to 350 and grease a 9x13 dish. Combine the first four ingredients in a mixing bowl and cut in the butter using a pastry blender. (I used a fork and knife. Not quite as effective, but it works.) Mix until you have coarse crumbs and press into the bottom of the baking dish. Bake for 18-20 minutes or edges are golden.

Meanwhile, stir together the remaining ingredients minus the extra powdered sugar. Pour that filling over the hot crust. (It's important that the crust is hot because the crust will help to bake the underside of the filling.) Bake for an additional 15-20 minutes or until the center is set. Cool completely before serving. Sprinkle with powdered sugar just before serving.
Press the crust into the bottom of the pan.
Once the crust bakes it will be slightly golden and it might have little holes from where the butter melted.
Whisk together the filling.
Be sure to use fresh lemons. It makes a difference!
Bake until the center is set. 
Once they are cool, sprinkle with powdered sugar.

Thursday, May 5, 2011

Cinco de Mayo

May 5 means two things at our house: another excuse to eat Mexican food (but who needs an excuse?) and our anniversary!
In honor of these 2 events I thought I would remind you of some of my favorite Mexican recipes, in case you are throwing your own fiesta. And I also want to give you the link to the recipe that won my husband's heart. Happy Cinco de Mayo!

Recipes to throw a yummy fiesta!


How to win a man's heart.

Wednesday, May 4, 2011

Pasta Salad

I LOVE pasta salad. I took this one to a birthday party recently and I was kinda sad when it was mostly gone by the end of the party because I wanted to eat it all! I love the versatility of pasta salad, you can pretty much throw in whatever you find in your fridge. I have made many variations, but this was the one I made last time and it was pretty tasty. The tricks to a good pasta salad is to 1. use a good dressing 2. add plenty of veggies 3. DO NOT overcook the pasta, it will jsut get softer as it absorbs the dressing 4. rinse the pasta well so it doesn't stick together 5. prepare it at least a couple of hours in advance so the dressing can soak in and the flavors can mix.

Classic Pasta Salad
1 package rotini pasta-the little spirals (I actually used a package that was a mix of rotini, shells, and penne--colored pasta is really pretty in this dish too)
1 bottle balsalmic vinaigrette
1-2 tomatoes finely diced
1 small head of broccoli cut into florets (you can use the stem too if you want)
1/2-3/4 cup chopped carrots (I used about 20 baby carrots)
1/2 can black olives, diced
1 small red onion, diced
1/2 bell pepper (any color) diced
about 1/3 cup parmesan cheese

Cook the pasta according to the package directions. Be sure to add salt to the boiling water and do not overcook! Once pasta is cooked, drain, and rinse well. While pasta is cooling, get chopping. Add all the chopped vegetables to the cooled pasta and toss in the dressing. Add the dressing a little at a time until you get the desired amount. I ended up using a little more than half the bottle. Cover and chill until ready to serve. You might want to add more dressing right before serving if the salad seems dry. Toss in the parmesan cheese right before serving.

Monday, May 2, 2011

Beef Tostadas

As you may have noticed, I love all Mexican food. This is an easy recipe that has made it into our regular lineup. You can use any kind of meat and toppings you like, but this is how I did it most recently and it was oh so tasty!

Beef Tostadas
1 small beef roast
salsa
1 packet taco seasoning
corn tortillas (about 2 per person)
refried beans
shredded cheese
shredded lettuce
diced tomatoes
sour cream
taco sauce or salsa

Place roast in crock pot and cover with salsa. Sprinkle with taco seasoning (use as little or much as you like). Cook on low for 8 hours. Once meat is cooked, shred with two forks. Twenty minutes before dinner place tortillas on cookie sheet and bake at 375 for 10-15 minutes, until crispy. Sprinkle tortillas with salt.While tortillas are baking, heat beans and prep toppings. Top each tortilla with beans, meat, cheese, lettuce, tomatoes, sour cream, and salsa. Enjoy!
In the morning put your meat in the crockpot. Don't forget the liner, it makes clean up a cinch!
Once the meat is done, shred it with two forks.
Bake the tortillas on a cookie sheet until they are crispy and the edges start to curl.
Top with all your favorite toppings!